Why we ask, and why it is good for you
Right now, if you use your own phone or laptop for work, your work apps and
your personal apps live in the same place, side by side.
Setting up for work draws a line between the two. We look after the work side. We cannot see
your personal side at all: not your photos, your messages, or your browsing. Two things follow,
and both are good for you:
- Lose your phone? Only the work side is wiped. Your own things are never
touched.
- Leave Prioticket? The work side is removed in one step, and nothing of
yours is involved.
What exactly can IT see, and what happens if I leave?
On a phone, tablet or Mac (the work-profile devices): we get an anonymous ID
for the work side and nothing that identifies the device: no serial number, no phone number,
no location. We cannot read your messages, open your photos, list your personal apps, unlock
the device, or wipe it. The most we can do is manage the work apps we put there and remove
them. A personal Windows laptop works a little differently, because Windows
has no work profile · its route below explains exactly what that changes before you enrol.
When you leave or ask to stop, the work side and its keys are deleted. Everything of yours
stays exactly as it was. Each route below spells this out for your specific device.
Why ask at all? The honest alternative is not "leave it alone forever". It is either not
allowing personal devices for work, or managing the whole device. This is the option that
keeps the most of your device yours.
What your device gets named
Company devices are given a plain name · your office, the type (laptop, desktop, phone or
tablet), then the device's own serial number, like "AMS-LT-1B4K7Z9". That is the whole
name. No username, nothing personal: it exists only so IT can tell devices
apart in the console, and who a device belongs to is looked up by its serial, never written
into the name. A device you own and enrol as personal is not renamed at all · it keeps
whatever you already call it.
All enrolment routes
Company Windows laptop or desktop
You do this · about 5 minutes
One tool. It installs the management agent for you · downloaded, checked,
and verified before it runs · and can bring the rest of the machine up to standard in the
same sitting. Nothing else changes about how you use it.
Windows must be Pro or Enterprise. Home has no BitLocker,
so it can never pass the disk-encryption check and cannot be made compliant · this applies to
every work machine, company-owned or your own. Everyone is entitled to a free Pro upgrade:
check Settings › System › About › Edition, and if it says
Home, ask the Access Hotline for a key. It is an in-place upgrade · nothing is wiped.
- Download the kit below on the machine itself, and unzip it to a folder.
- Double-click START-HERE.cmd. It asks for administrator rights, then shows
a short menu.
- Choose 1 · Install the Prioticket UEM Cloud agent. It downloads the agent,
verifies it, installs it, and waits for the service to come up.
- That is it. It ends with awaiting administrator approval · that is expected · your
device is submitted automatically and approved for you, with nothing more to do. It appears
in management within a few minutes.
The tool.
Download the provisioning kit
Internal only. The download sits behind your Prioticket
sign-in · open it on the machine you are enrolling.
The same menu also runs the read-only check (option 3), which changes
nothing, and the guided build the team uses to prepare a laptop before handover. You never
have to leave the menu, but it maps one-to-one onto the command line if you prefer:
powershell -ExecutionPolicy Bypass -File .\Provision-Laptop.ps1 -Mode Check
Just the agent, without the tool
If you only want the management agent and nothing else · no check, no menu · this is the
agent installer on its own. The tool above installs this same agent and verifies its
checksum first, so prefer the tool unless you have a reason not to.
- Open the download link below on the machine itself.
- Run the installer it downloads. It ends with awaiting administrator approval,
submitted for you.
The agent. It is different for each office · pick yours.
Not sure? Ask the Access Hotline. The full
imaging kit and its docs live in GitLab; company code stays there and this download is a
convenience copy behind your sign-in.
Company Mac
Peter does this · nothing to install
Nothing to download. Company Macs are enrolled through Apple Business
Manager, which hands the machine to management during setup rather than afterwards.
- Message Peter with the machine. He adds its serial number to our Apple
Business Manager account.
- He tells you what to click on the Mac itself, which is usually one prompt during
setup.
Why a company Mac is treated differently from one you own
Apple Business Manager enrolment makes a Mac supervised, which is a meaningfully
higher level of control than an ordinary managed device. That is deliberate and it
applies to company hardware only. It is never applied to a Mac you own.
Supervision lets IT install, configure and remove apps, manage software updates, enforce
the full set of restrictions and, if a company Mac is lost, remotely erase or lock it.
Even at this level Apple's framework can never read your email, messages or browsing.
Apple's own document lists exactly what supervision does and does not allow:
Managing Devices and Corporate Data (PDF, Apple).
Company iPhone or iPad
Peter does this · nothing to install
Same route as company Macs, and again nothing to install.
- Message Peter to have the device added to Apple Business Manager.
- The device picks up management the next time it goes through setup.
Much easier before the phone is handed over. Because
step 2 happens during setup, doing this to a phone already in use means resetting it
first.
How this differs from a phone you own
A company iPhone or iPad is managed as a whole device rather than as a work profile. The
work profile arrangement is for phones you own yourself, and the two are not the same
thing.
As a supervised device it can have apps installed, configured and removed, its updates
managed, the full set of restrictions enforced and, if lost, be remotely erased. Even so,
Apple's framework can never read your email, messages or browsing on any managed device.
Apple sets out the full list in its own document:
Managing Devices and Corporate Data (PDF, Apple).
Company Android phone or tablet
You do this · about 10 minutes
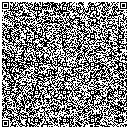
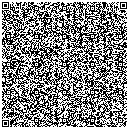
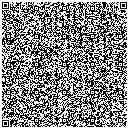
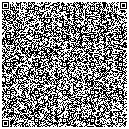
You scan a code during setup, from a factory-fresh device only, so a
phone already in use has to be reset first. The code is different for each office and for
phone versus tablet, so use the right one below.
- Factory reset the device, or start from the welcome screen if it is new and still
boxed.
- Tap the welcome screen six times. A QR scanner opens. There is no
on-screen hint that this works, which is why it is written out here.
- Join wifi when it asks.
- Scan your office's code below · the phone one for a phone, the tablet
one for a tablet. They carry different enrolment tokens, so the right one matters.
- The device configures itself, finishes setup as a company device, and picks up its name
(like AMS-PH-serial). A few minutes, unattended.
Amsterdam phone · names it AMS-PH-…
Amsterdam tablet · names it AMS-TB-…
Fully-remote / other phone · names it RW-PH-…
Fully-remote / other tablet · names it RW-TB-…
Not set up yet. Company-device enrolment for
this office is not ready. Message the Access Hotline and
we will enrol your device and give it the right name · do not use another office's code, it
enrols against the wrong office.
This wipes the device. It is for company phones only.
If the phone is yours, use the personal Android route instead, which adds a work profile
and deletes nothing.
The code carries our enrolment token. Fine inside Prioticket and behind
this sign-in, which is why it is here rather than emailed. Please do not photograph it into
a public channel.
Company Linux laptop or desktop
You do this · about 10 minutes
One tool. It installs the management agent for you · the right one for
your CPU, checksum-verified before it runs · and can bring the machine up to our Linux
standard in the same sitting. One file, no dependencies.
Check your distribution first. Endpoint Central officially
supports Ubuntu, Debian, RHEL, Fedora, Rocky and AlmaLinux, openSUSE and SUSE, Linux Mint, and
Amazon and Oracle Linux. On other distributions · including Arch-based ones such as CachyOS,
Manjaro and EndeavourOS · the agent installs but may fail to upgrade or report reliably, so
central management is not guaranteed. Confirm your distro is on the supported list before you
rely on this.
- Download the kit below on the machine itself and unpack it:
tar xzf prioticket-provision-linux.tar.gz
- Run it. With no arguments it shows a menu:
sudo bash provision-linux.sh
- Choose 1 · Install the Prioticket UEM Cloud agent. It picks the build for
your CPU, verifies its checksum, installs it, and confirms the service is running.
- That is it. It ends with awaiting administrator approval · that is expected · your
device is submitted automatically and approved for you, with nothing more to do. It appears
in management within a few minutes.
The tool.
Download the provisioning kit
Internal only. The download sits behind your Prioticket
sign-in · open it on the machine you are enrolling.
The same menu runs the security standard · disk encryption with
recovery-key escrow, firewall, screen lock, automatic updates, SSH and account hygiene, and
keeping code on GitLab · and every step maps onto a flag if you prefer the command line:
bash provision-linux.sh --check reads only,
--guide explains each step, --apply fixes with per-step consent.
Just the agent, without the tool
If you only want the management agent · no check, no menu · this is the installer on its
own, and you pick the build for your CPU. The tool above installs this same agent
and verifies its checksum first, so prefer the tool unless you have a reason not to.
- Download the agent for your office and CPU, then unzip what it downloads. Its name
starts with your office, for example:
unzip Amsterdam_UEMSLinuxAgent_X64.zip
- Make the extracted installer executable and run it (use
sudo if asked):
chmod +x UEMS_LinuxAgent_x64.bin && ./UEMS_LinuxAgent_x64.bin
The agent. It is different for each office · pick yours.
The filenames in the steps above match whichever file you download.
Your own Linux laptop or desktop
You do this · about 5 minutes
Open the self-enrolment link and sign in with your work address. It is the
same link the phones and Apple devices use.
- Open the link below on the machine itself.
- When it asks you to sign in, use your @prioticket.com address.
- Follow the prompts to finish enrolment.
Start here, on the machine.
zmdm.co/i8i2wmhq
Linux does not have a work profile. Unlike the Android and
Apple routes, there is no separate encrypted work area on Linux, so enrolment adds the
management agent to the machine itself. If that is not what you want on a personal Linux
machine, a company machine is the better answer · say so and we will sort it out.
Your own Mac, iPhone or iPad
You do this · about 5 minutes
Creates a separate, encrypted work area on the device. Your personal
side is untouched and stays invisible to us. Nothing of yours is moved, changed or
deleted.
- Open the link below on the device itself.
- When it asks you to sign in, use your @prioticket.com address, not
your personal Apple ID.
- Accept the work profile when prompted. Your personal Apple ID stays signed in
alongside it.
Start here, on the device.
zmdm.co/i8i2wmhq
Needs macOS 15.2, or iOS and iPadOS 18.2, or later.
Apple did not offer this kind of enrolment before those releases. If your device is older,
say so and we will sort it out separately rather than leaving you stuck.
What we can and cannot see, and what happens if you leave
This is not company device management. Apple built a separate mode for
personal devices, called Account Driven User Enrollment. Enrolling creates a second,
encrypted volume purely for work, and Apple enforces the boundary in the operating system.
The limits below are Apple's, not ours · the same limits apply to any MDM.
What IT can do
- Set up the work accounts and the work apps we provide, and a per-app VPN for
them
- Require a passcode · a basic one only; Apple does not let us demand a complex
one here
- Enforce certain restrictions on the work side
- See the work apps, and remove the work data and apps · only those
What IT cannot see or do
- Your personal apps, photos, messages, mail or browsing history
- Your location
- Your serial number or IMEI · Apple gives us an anonymous enrolment ID instead
- Collect any logs from your device, or take over a personal app
- Require a complex passcode, clear your passcode, or unlock the device
- Remotely wipe the whole device
If you leave, or want out. Unenroll and the work volume and its
encryption keys are deleted. Work data goes, everything of yours stays, and the device
is exactly as it was.
You do not have to take our word for any of this. Apple sets out exactly
what an MDM can and cannot do on a personal device in its own document:
Managing Devices and Corporate Data (PDF, Apple).
macOS 15.2 is higher than the minimum the posture check uses, and a
different thing: that one is the version we accept, this is the version Apple needs
before this kind of enrolment exists at all.
Your own Android phone or tablet
You do this · about 5 minutes
Creates a separate, encrypted work profile. Work apps get a small
briefcase badge. Your personal side is untouched, and you can switch the work side off
whenever you like.
- Install the work app. On the phone, open the link below, or scan the
code with the phone's camera. Either one takes you to install ME MDM
from Google Play.
- Open ME MDM once it has installed. On its enrolment screen, tap
Scan QR Code.
- Scan the code on this page. Doing this on the phone itself, with no
second screen to scan from? Tap the link instead · it hands the
app the same details, so you can skip the scan.
- Sign in with your @prioticket.com account when Google asks
· not your personal one · and approve
the access prompt.
- Accept the work profile. It takes a couple of minutes. Work apps then
get a briefcase badge, and everything already on the phone is unchanged.
The link, and the code to scan.
zmdm.co/i8i2wmhq

Not the same as the company phone route. The company
Android route starts from a factory reset and wipes the device, and it is only for
company-owned phones. This one adds a work profile to a phone you already use and deletes
nothing. They are easy to confuse, and the consequences are not the same.
What we can and cannot see, switching it off, and leaving
You can pause it whenever you like. One toggle: work apps grey out,
work notifications stop, your personal side carries on. Nothing is deleted and nothing
is reported to us. This is the one thing Android gives you that Apple does not.
What IT can see and do
- Manage the work accounts and work apps we provisioned
- Require a screen lock
- Remove the work profile, which erases work data only
What IT cannot see or do
- Your personal apps, photos, messages, mail, browsing or files
- Your location
- Your serial number or IMEI. Android stopped giving those to work profile
management, so we get an enrolment-specific ID
- Change or clear your screen lock, or unlock your device
- Factory reset or wipe your device
If you leave, or want out. Delete the work profile and its encryption
keys go with it. Work data goes, everything of yours stays.
A note on the work VPN. If your work uses a VPN (Cloudflare WARP), it is
there to protect your work traffic, not to watch your personal side. On a phone
with a work profile it should stay on the work apps only. If you ever notice it active
while you are in personal apps · a VPN badge during personal
browsing, or something like Android Auto refusing to connect ·
tell us. That usually means it is not confined to the work side, and it is worth sorting
out.
Needs Android 11 or later. Unlike the Apple versions, that is our own
access requirement rather than a limit of the work profile, which works on older
Android.
Your own Windows laptop
You do this · about 15 minutes
A personal Windows laptop takes four short phases: create a separate
work login with GCPW, make that login an administrator once (Windows needs
that to add a work account), enrol from it, then check it worked. Read the note at the end
too · Windows works differently from a phone.
Windows must be Pro or Enterprise. Home has no BitLocker,
so it can never pass the disk-encryption check and cannot be made compliant. Everyone is
entitled to a free Pro upgrade: check Settings › System › About ›
Edition, and if it says Home, ask the Access Hotline for a key before you enrol.
It is an in-place upgrade · nothing is wiped.
1 · Create your work Windows login (GCPW)
First you set up a separate work login on your laptop.
GCPW (Google Credential Provider for Windows) adds an Add work account option
to your Windows sign-in screen; signing in there with your @prioticket.com account creates a
work Windows profile separate from your personal one, using your Google password and 2-step
verification. Your personal login and files stay private and untouched. You enrol from
the work login, so the work-account connection lives on the work profile, not your personal
one.
- On your personal login (you are the administrator of your own laptop),
download and run the GCPW installer. (needs administrator rights)
- Sign out. On the Windows sign-in screen choose Add work account and sign
in with your @prioticket.com account. This creates your work Windows login.
The GCPW installer · run it on your personal login.
Download GCPW
Internal only. The installer is preconfigured for Prioticket
and sits behind our login. Please do not share it outside the company.
2 · Make the work login an administrator (one time)
Windows only lets an administrator add a work or school account.
Enrolling as a standard user gives “You don’t have the right privileges to
perform this operation. Please talk to your admin.” That is a normal Windows rule,
not something specific to us, and you can undo it afterwards.
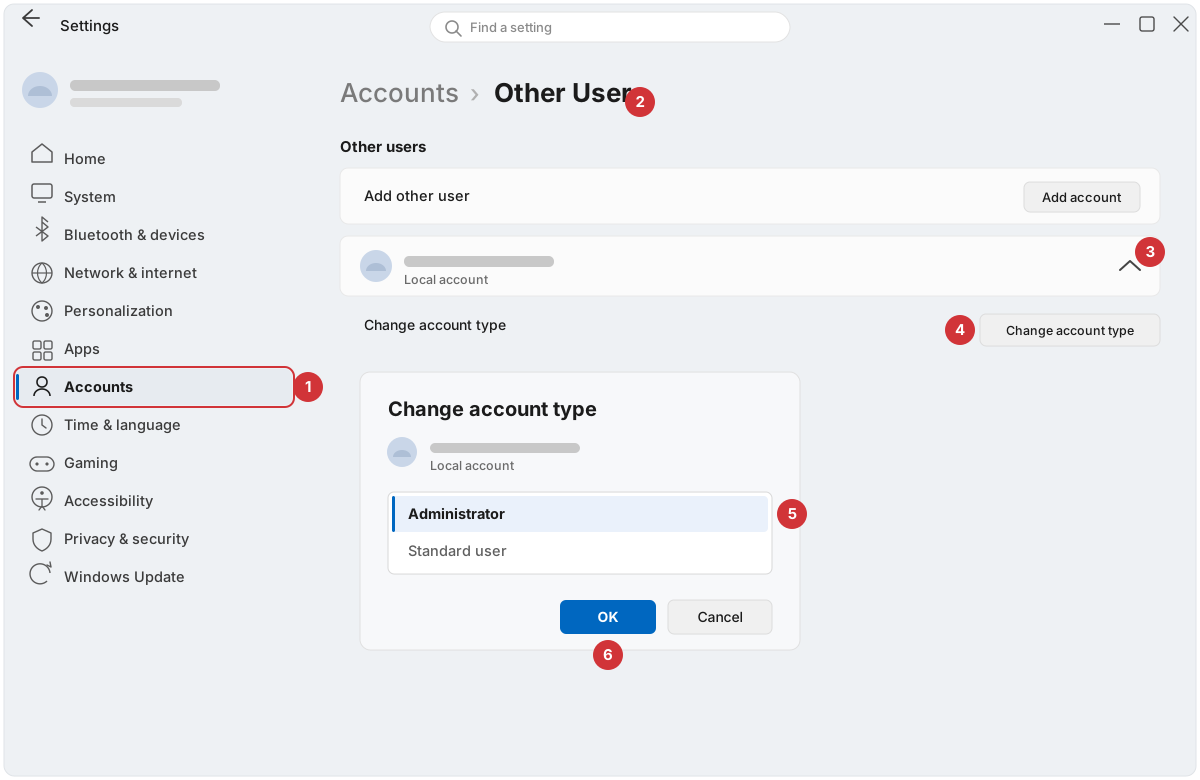
- Sign in to your personal login (the administrator one) and open
Settings › Accounts › Other users.
- Find your @prioticket.com account, click the ^ to
expand it, then Change account type.
- Choose Administrator and click OK.
3 · Enrol, from your work login
- Sign in to your work (@prioticket.com) Windows login.
- Open the link below on the laptop itself and sign in with your
@prioticket.com address.
- Follow the prompts to finish. Windows records it under
Settings › Accounts › Access work or school.
Start here, in your work login.
zmdm.co/i8i2wmhq
4 · Check it worked
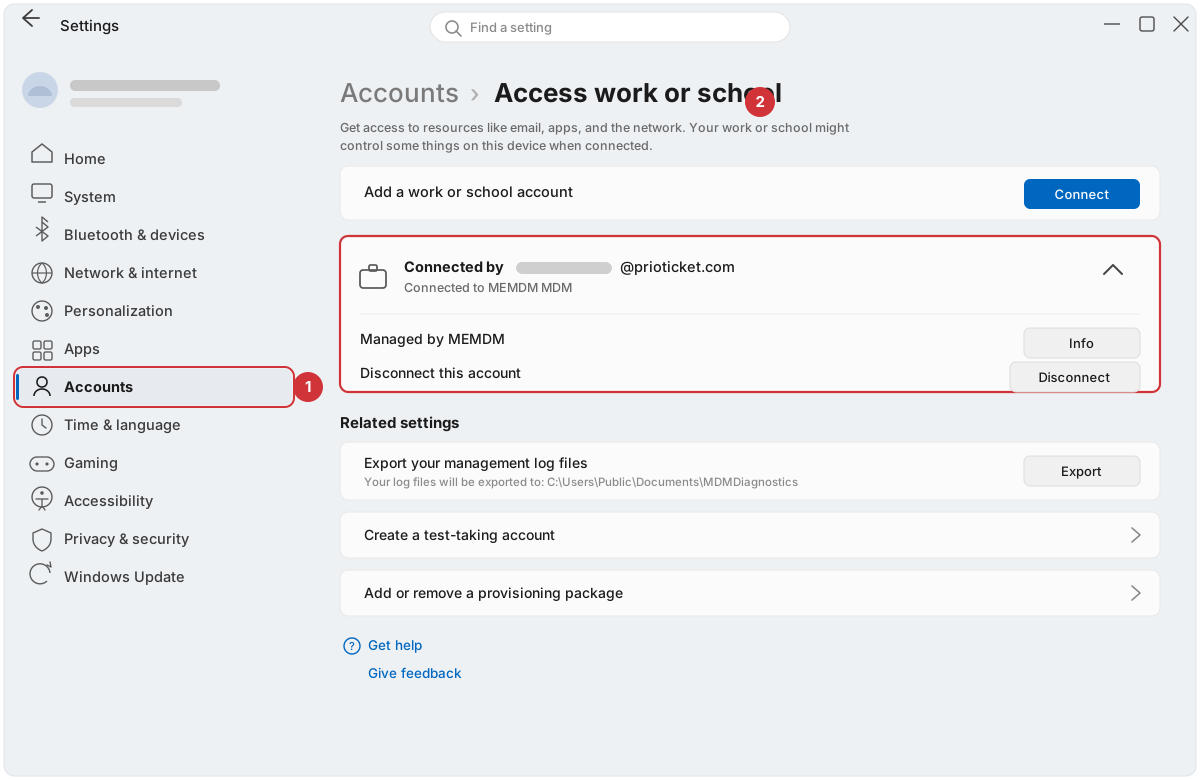
Still in your work login, open
Settings › Accounts › Access work or school. You should see
Connected by your @prioticket.com address, with Connected to MEMDM
MDM underneath. Expand it to confirm Managed by MEMDM. The
Disconnect button there is how you leave, whenever you want. You can now set
the work login back to Standard user if you prefer (Phase 2 in reverse).
What this means on a Windows laptop. A phone keeps work in
a separate area; Windows does not, so setup covers the whole laptop. Plainly:
We can switch on and check a few security basics · disk
encryption, firewall, antivirus and security updates · so a work laptop is not left wide open.
We cannot see anything personal · not your files,
photos, messages, browsing or screen. The tooling does security checks and a software
list, nothing more.
What this does, and how to undo it
Why it is different from a phone. Android and Apple build a work profile
into the operating system, a separate space we manage and cannot see past. Windows has no
equivalent (Microsoft retired the one it had), so management applies to the device as a
whole.
What it is not. It is not a way to read your personal
files, your photos, your messages, your browsing or your screen · we do not access any of
that. What the management actually does is turn on and verify the security protections above
(encryption, firewall, antivirus, patches) and take a list of installed software and the
device’s security state. The one honest difference from a phone: because Windows has no
OS-enforced work container, that line between work and personal is held by our written policy
and the independent oversight below · who can veto changes and see every action · rather than
by the operating system itself. That is exactly why we write it down and answer to them for
it.
Leaving. You can unenrol yourself at any time from
Settings › Accounts › Access work or school, which removes the work apps and
policies and ends the management.
